How to Plan FRP Layout for Maximum Efficiency | plan FRP layout
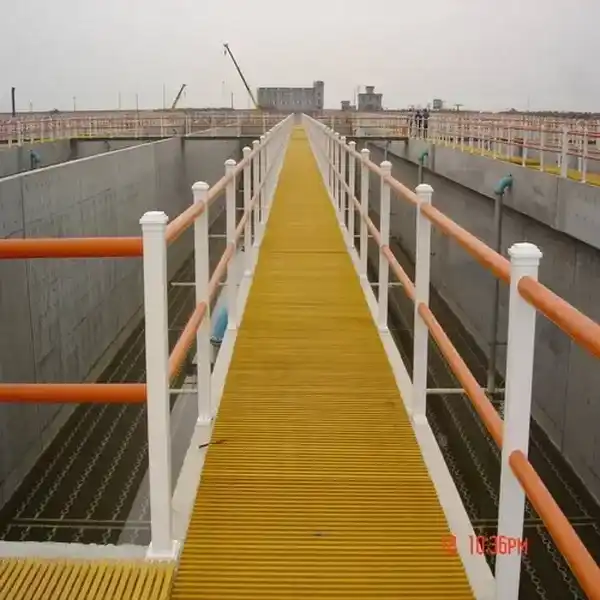
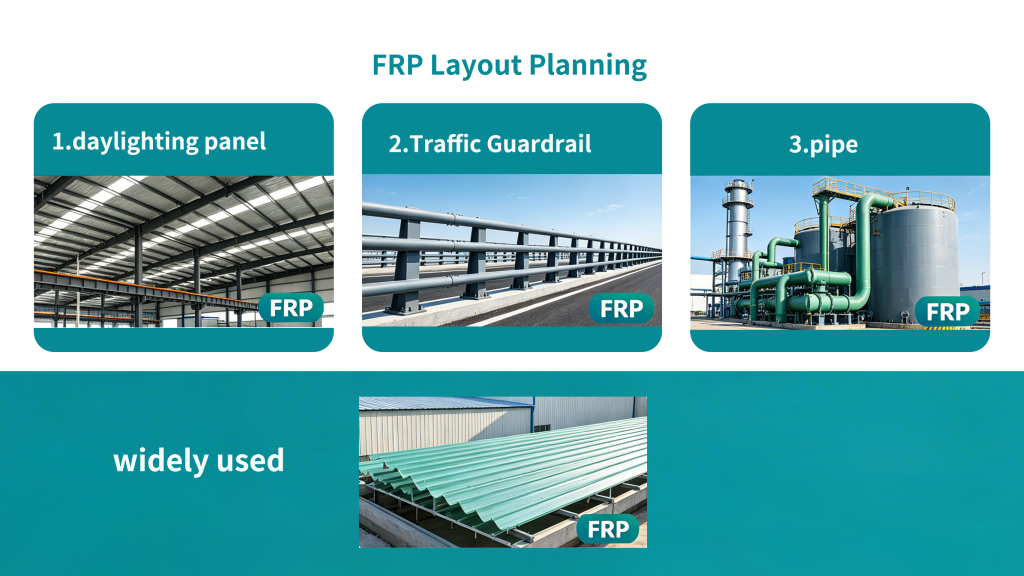
When it comes to industrial, commercial, or infrastructure projects that use fiber-reinforced polymer (FRP) materials, the layout planning of FRP profiles and FRP grating is not just a secondary step—it’s the foundation of ensuring structural integrity, cost-effectiveness, and long-term performance. A poorly planned FRP layout can lead to material waste, installation delays, compromised safety, and even reduced service life of your FRP components. On the other hand, a well-optimized layout maximizes the efficiency of every FRP profile and FRP grating panel, minimizes waste, speeds up installation, and ensures your project meets all design and safety standards. At mingchi, we’ve helped countless clients optimize their FRP layouts for diverse applications—from industrial platforms to wastewater treatment plants—and in this blog, we’ll share our step-by-step guide to planning an FRP layout that delivers maximum efficiency. Why FRP Layout Planning Matters (And What Happens When It’s Overlooked) FRP materials—including FRP profiles and FRP grating—are celebrated for their lightweight, corrosion resistance, high strength-to-weight ratio, and low maintenance requirements. But these benefits can only be fully realized if the layout is designed with purpose. Unlike traditional materials like steel or concrete, FRP components have unique properties that influence layout decisions: they are lightweight but require proper spacing to handle loads, they can be customized but need precise cutting to avoid waste, and their corrosion resistance makes them ideal for harsh environments—but only if the layout accounts for environmental stressors. Step 1: Conduct a Comprehensive Site Assessment & Define Project Requirements The first step in planning an efficient FRP layout is to conduct a thorough site assessment and clearly define your project’s goals. This stage lays the groundwork for every subsequent decision, from choosing the right FRP profiles and FRP grating to determining spacing and installation methods. Here’s what to focus on: By addressing these factors upfront, you’ll avoid costly rework and ensure your FRP layout is tailored to your project’s unique needs. For personalized guidance on assessing your site, visit mingchi to consult our team of FRP experts. Step 2: Choose the Right FRP Profiles & FRP Grating for Your Layout Not all FRP profiles and FRP grating are created equal—and choosing the right products is key to an efficient layout. The type, size, and configuration of your FRP components will directly impact layout efficiency, material usage, and performance. Here’s how to select the right products: FRP Profiles: Match Shape to Function FRP profiles come in a variety of shapes, each designed for specific structural roles. Common types include I-beams, channels, angles, T-beams, and rectangular tubes—each with unique load-bearing capabilities. When planning your layout, select FRP profiles that align with your structural needs to avoid over-engineering (which wastes material and increases cost) or under-engineering (which compromises safety). For example: FRP I-beams are ideal for main support structures (platform beams) due to their high bending efficiency.FRP channels work well for edge beams, stair stringers, and cable trays.FRP angles are perfect for bracing, connection legs, and reinforcing corners. Additionally, consider the length of FRP profiles—using longer profiles (where possible) reduces the number of joints, speeding up installation and improving structural integrity. At mingchi, we offer custom FRP profiles in various lengths and sizes to fit your layout needs, minimizing waste and simplifying installation. FRP Grating: Optimize Panel Size & Mesh Configuration FRP grating is available in different panel sizes, mesh configurations (19x19mm, 25x25mm), and thicknesses—each suited to different applications . When planning your FRP grating layout, aim to use full panels wherever possible to reduce cutting and waste. For irregular areas, measure carefully and order custom-cut panels to ensure a perfect fit. Key considerations for FRP grating layout: Panel Size: Standard FRP grating panels are often 1.2m x 2.4m, but custom sizes are available. Using full panels minimizes seams, which reduces installation time and improves safety (fewer gaps to trip over). Mesh Configuration: Smaller mesh sizes ( 19x19mm) are ideal for applications where small objects might fall through (industrial platforms), while larger mesh sizes (50x50mm) work well for light-duty walkways. The mesh size also impacts load capacity—smaller meshes distribute weight more evenly. Thickness: Thicker FRP grating (25mm–50mm) is suitable for heavy loads, while thinner grating (19mm) works for light-duty applications. Match the thickness to your load requirements to avoid overusing material. By selecting the right FRP profiles and FRP grating for your layout, you’ll maximize efficiency, reduce waste, and ensure long-term performance. For help choosing the right products, explore our selection at mingchi. […]